Find a pre-screened local mold removal specialist Free Estimate
Find a Mold Specialist Now
Click or Call, Toll-Free 24/7
Mold Remediation
Step-By-Step Guide
We’d like to offer you a brief mold remediation step-by-step guide, but please keep in mind, that removing mold can be an incredibly complex task. If you have mold that covers a surface areas greater than ten square feet, or if you have mold in your HVAC system, the Environmental Protection Agency recommends hiring a mold removal professional to handle the job. If you have any health problems, especially respiratory problems, it’s also best to hire a professional so you don’t expose yourself to greater health risks.
Step One: Locate All Mold

There’s really no point only removing some of the mold in a home. If you miss even a little bit, it will simply grow and spread and soon you’ll have a full-blown mold problem on your hands again. We recommend having a professional test your home for mold, but there are also tests you can purchase and conduct yourself. (Professional tests are more accurate and detailed). Check for mold in every room of your house, paying particular attention to any damp areas and any areas that have a musty odor. Keep in mind that mold can be found growing under carpet or other floor coverings, above ceiling tiles, inside walls, and inside heating and air conditioning ducts.
You can follow the link to get a list of professional mold testers in your area that are licensed, insured, and trained specifically in mold remediation.
Step Two: Assemble Your Supplies
While some people use bleach to clean up mold, we recommend purchasing a fungicide like Foster 40-80. You’ll also need sheets of heavy plastic and tape to seal off your work area, heavy plastic bags for removing moldy materials, an N-95 face mask, gloves and other protective clothing, a spray bottle of water, and a scrub brush or rag for cleaning moldy surfaces. You may also need disposable paint brushes and a product for encapsulating mold, like Foster 40-50. We also recommend a vacuum with a HEPA filter, especially if you’re performing mold remediation over a large area. In addition, you’ll need whatever tools and materials are necessary for removing and replacing moldy materials that cannot be cleaned, such as new drywall or new carpeting and the tools to install it.
Follow this link for more information on cleaning and encapsulating products.
Step Three: Prepare the Work Area
Remove any personal items from the area, or if items cannot be removed, cover them completely with sheets of heavy plastic so they do not become contaminated with mold.
To prevent the spread of mold spores from your work area to other areas of the home, seal off the area in which you will be working with sheets of heavy plastic and duct tape. Tape plastic over any heating or air conditioning vents, as well.
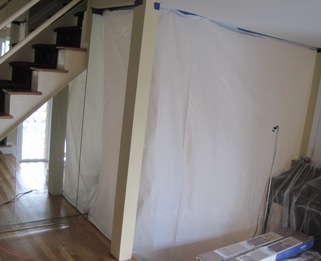
In this photo the den of a home with mold has been sealed off from house using 6 mil. polyethylene sheeting. A negative air machine is located inside, and an air tester can be seen outside to make sure no mold spores get into the rest of the house. A piano and all furniture were moved outside of the work area. The piano was covered with plastic because is was so close to the work area.
Step Four: Set Up Air Pressure in The Work Area
Negative pressure in the work area causes air to flow out of that area, usually outdoors, thereby preventing airborne mold spores from spreading to other areas of the home. You don’t have to set up negative pressure in the work area but it’s a good idea, especially if you’re dealing with a large amount of mold. You can create negative pressure with a high performance shop vac. After using sheets of heavy plastic to create barriers around your work area, put the shop vac with intake and exhaust hoses attached in the work area. Make a small hole in one of the plastic sheet barrier walls and extend the exhaust hose through the hole and out the nearest window. Use duct tape to seal the opening around the hole in the plastic sheet barrier wall and around the window.
This article explains the importance of airflow during mold removal.
Step Five: Wear Protective Gear
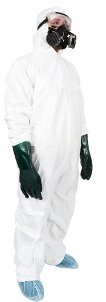
Wear your protective gear before beginning mold remediation, including an N-95 face mask, gloves, hair and shoe covers, and clothing you will either dispose of or launder in hot water as soon as you’re done working. In some cases a Tyvek Suit is necessary.
More on personal protection when removing mold.
Step Six: Remove Moldy Materials That Cannot Be Adequately Cleaned
Spray moldy materials like drywall or carpeting lightly with a spray bottle of water before removing them in order to minimize the risk of mold spores being dispersed into the air. Using a vacuum with a HEPA filter while cutting into moldy drywall or similar materials will also help prevent mold spores from being dispersed during the process. Seal them in heavy plastic trash bags before carrying them through the house for disposal.
Step Seven: Apply Fungicide to Materials That Can Be Adequately Cleaned
Apply a fungicide like Foster 40-80 to non-porous materials, like metal, tile, bathtubs, sinks, and countertops, either using a spray bottle or with a rag. Use a scrub brush or rag to remove mold. For porous materials that cannot be removed, like wooden studs in the wall, remove as much mold as possible. Sometimes sanding the wood is necessary to remove mold, but this should only be done by a trained professional because it tends to disperse large amounts of mold spores
More on how to remove mold from non-porous surfaces.
More on products for cleaning mold.
Step Eight: Encapsulate Any Areas of Mold on Materials That Cannot Be Adequately Cleaned or Removed
Sometimes mold is found on porous surfaces that cannot be fully cleaned but that also cannot be removed, such as the wooden studs inside a wall. After removing as much mold as possible and cleaning the surface as well as you can with a fungicide, use a disposable paint brush to apply an encapsulating produce like Foster 40-50. This goes on like paint, but unlike regular paint, it seals in any remaining mold so that it cannot continue to spread. It also contains antimicrobial ingredients that help kill and repel mold.
More detailed information and pictures of mold encapsulation.
Step Nine: Complete Any Repairs
Complete any repairs, such as replacing carpeting or drywall that had to be removed.
For More Information
For a complete, detailed mold remediation step-by-step guide, we recommend the ebook A Homeowner’s Complete Guide to Mold Remediation by Brian Turner, an expert in mold remediation. In addition to clear step-by-step instructions, the guide contains multiple photos to help you understand exactly what to do. Follow the link to learn more about our top recommended guide to mold remediation written especially for homeowners.
Additional Reading:
Mistakes Homeowners Make When Removing Mold - Common mistakes and tips for avoiding them.
Getting Rid Of Mold - Why it is so important to remove mold from your home, why removing mold is more difficult than most people realize.
Mold Removal Techniques - Where the mold is growing, and how much there is, determines how it should be cleaned. This article discusses techniques that homeowners can use.
Mold Remediation Methods That Professional Use - Discussion of the pros and cons of the most popular methods that professionals use to remove mold from non-porous and semi-porous surfaces.
Subfloor Mold - How to determine if you have mold in your subfloors. Causes, health risks, proper removal....
Mold Stain Removal - After mold has been removed, sometimes stains will remain. How to safely and effectively remove mold stains and improve the appearance of your home and furnishings.
Mold Removal From Waterbeds - Help dealing with waterbed mold, which could be on the exterior or interior of the surface. If you have a leak be sure to also check around the bed for mold growth.
Front Load Washer Mold - How to deal with mold in washing machines, and why mold in front load washers is more common than top loading machines.
Crawlspace Mold - How to deal with mold in your crawlspace. When it is safe remove it yourself, and when you should hire a professional.
If you are interested in controlling mold without toxic chemicals, read this article to learn more.
Return From Mold Remediation Step By Step Guide To Home Page
Free Home Inspection By A Mold Removal Specialist
Search This Website
Recent Articles
-
See Our 5 Recommended Mold Removal Companies in Wheaton, IL
Jun 20, 24 10:33 AM
-
See Our 5 Recommended Mold Removal Companies in Aberdeen, SD
Oct 08, 21 04:05 PM
-
Public Housing Tenant Sick from Mold
Apr 24, 20 01:40 PM
